2Pcs Wemos TTGO LORA SX1278 ESP32 0.96 OLED Module 16 Mt Bytes (128 Mt bit) 433Mhz For Arduino
$38.39
Product Description:
The 433MHz antenna must be used in conjunction with the IPEX interface (if the antenna is not connected, it may damage the LoRa chip)
Lithium battery charging and discharging circuit, when the battery is full, the blue LED will stop working. When using, pay attention to the positive and negative of the battery, otherwise it will be damaged.
Using the IO port touch screen touch signal input, you need to add the 100nF pull-down capacitor at this pin!
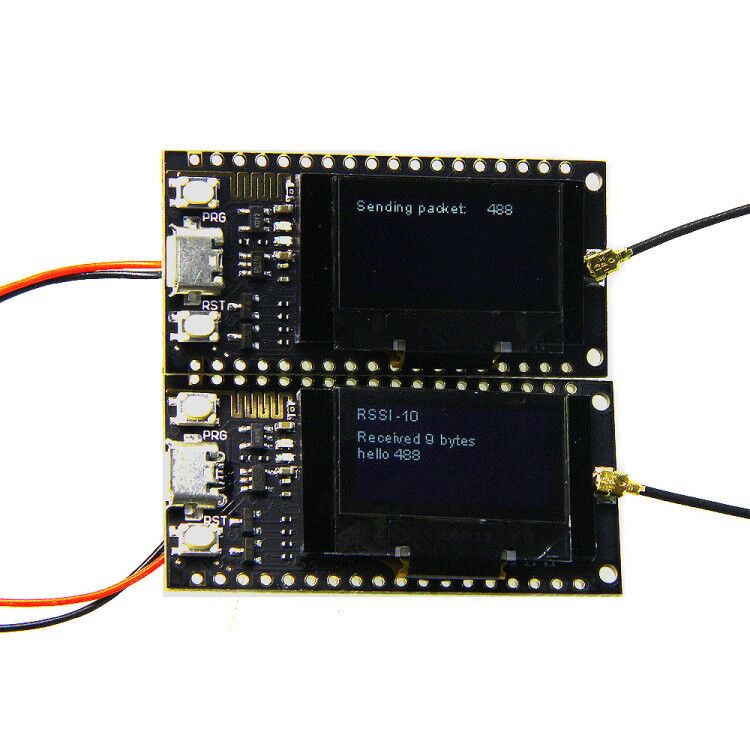
This product is a SX1278 chip based on ESP32 WIFI increased OLED, namely LoRa remote modem, 433MHz frequency, high sensitivity is about -148dBm, +20dBm output power, high reliability, long transmission distance.
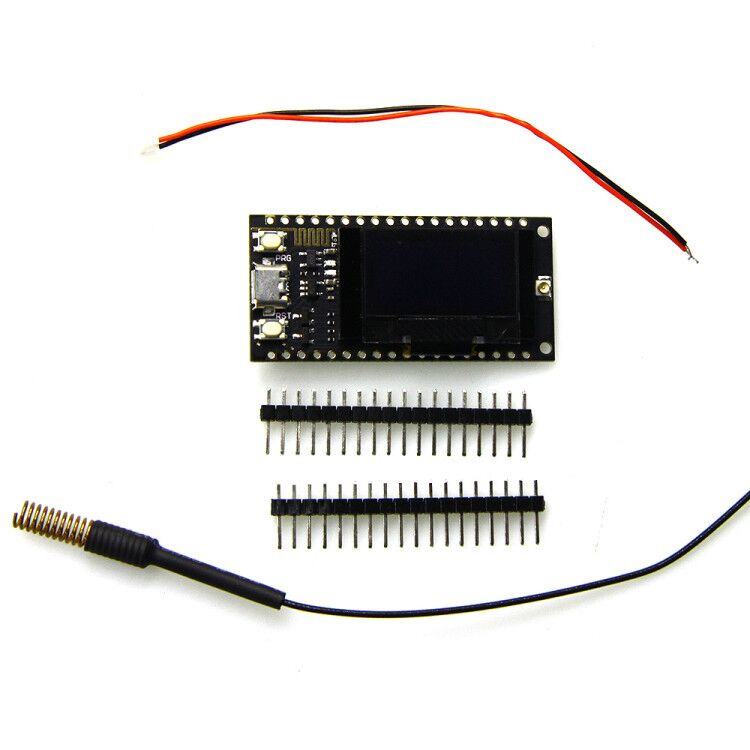
The onboard 16 Mt bytes (128 Mt bit), Wi-Fi antenna, 0.96 inch blue OLED display, lithium battery charging circuit, CP2102 interface and USB serial chip, the perfect support for Arduino development environment, can be used for program verification and product development is very simple and fast.
Operating voltage: 3.3V to 7V
Operating temperature range: -40 degrees C to +90 degrees C
Support for Sniffer, Station, softAP, and Wi-Fi Direct modes
Data rates: 150 Mbps@11n HT40, 72 Mbps@11n HT20, 54 Mbps@11g, 11 Mbps@11b
Transmit power: 19.5 dBm@11b, 16.5 dBm@11g, 15.5 dBm@11n
Receiver sensitivity up to -98 dBm
UDP sustained throughput of 135 Mbps

Pin reference description:
For more product information, click https://drive.google.com/file/d/1L8ll-DeAC2SATBZn0-KbSaZsrinbnXkF/view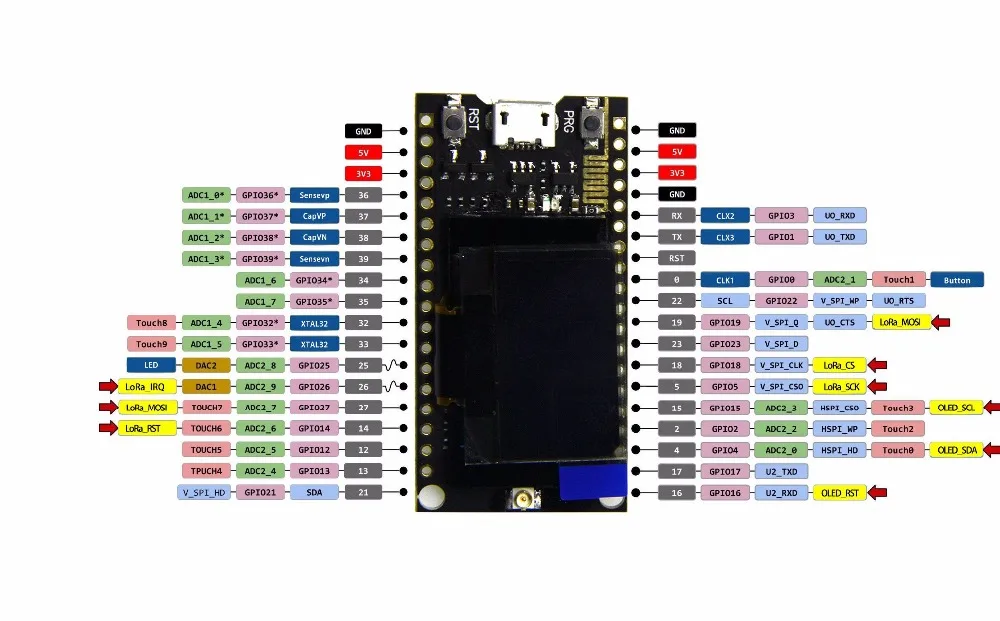
Test details:


Click links for more details: https://eyun.baidu.com/s/3hsiTNgg
For example One:
(1) LoRaSender
#include
#include
#include
// GPIO5 — SX1278's SCK
// GPIO19 — SX1278's MISO
// GPIO27 — SX1278's MOSI
// GPIO18 — SX1278's CS
// GPIO14 — SX1278's RESET
// GPIO26 — SX1278's IRQ(Interrupt Request)
#define SS 18
#define RST 14
#define DI0 26
#define BAND 433E6
int counter = 0;
void setup() {
pinMode(25,OUTPUT); //Send success, LED will bright 1 second
Serial.begin(115200);
while (!Serial); //If just the the basic function, must connect to a computer
SPI.begin(5,19,27,18);
LoRa.setPins(SS,RST,DI0);
// Serial.println("LoRa Sender");
if (!LoRa.begin(BAND)) {
Serial.println("Starting LoRa failed!");
while (1);
}
Serial.println("LoRa Initial OK!");
}
void loop() {
Serial.print("Sending packet: ");
Serial.println(counter);
// send packet
LoRa.beginPacket();
LoRa.print("hello ");
LoRa.print(counter);
LoRa.endPacket();
counter++;
digitalWrite(25, HIGH); // turn the LED on (HIGH is the voltage level)
delay(1000); // wait for a second
digitalWrite(25, LOW); // turn the LED off by making the voltage LOW
delay(1000); // wait for a second
delay(3000);
}
For example Two
(2)LoRaReceiver
#include
#include
// GPIO5 — SX1278's SCK
// GPIO19 — SX1278's MISO
// GPIO27 — SX1278's MOSI
// GPIO18 — SX1278's CS
// GPIO14 — SX1278's RESET
// GPIO26 — SX1278's IRQ(Interrupt Request)
#define SS 18
#define RST 14
#define DI0 26
#define BAND 433E6
void setup() {
Serial.begin(115200);
while (!Serial); //if just the the basic function, must connect to a computer
delay(1000);
Serial.println("LoRa Receiver");
SPI.begin(5,19,27,18);
LoRa.setPins(SS,RST,DI0);
if (!LoRa.begin(BAND)) {
Serial.println("Starting LoRa failed!");
while (1);
}
}
void loop() {
// try to parse packet
int packetSize = LoRa.parsePacket();
if (packetSize) {
// received a packet
Serial.print("Received packet '");
// read packet
while (LoRa.available()) {
Serial.print((char)LoRa.read());
}
// print RSSI of packet
Serial.print("' with RSSI ");
Serial.println(LoRa.packetRssi());
}
}
For example three
(3)LoRaReceiverCallback
#include
#include
// GPIO5 — SX1278's SCK
// GPIO19 — SX1278's MISO
// GPIO27 — SX1278's MOSI
// GPIO18 — SX1278's CS
// GPIO14 — SX1278's RESET
// GPIO26 — SX1278's IRQ(Interrupt Request)
#define SS 18
#define RST 14
#define DI0 26
#define BAND 433E6
void setup() {
Serial.begin(115200);
while (!Serial); //if just the the basic function, must connect to a computer
SPI.begin(5,19,27,18);
LoRa.setPins(SS,RST,DI0);
Serial.println("LoRa Receiver Callback");
if (!LoRa.begin(BAND)) {
Serial.println("Starting LoRa failed!");
while (1);
}
// register the receive callback
LoRa.onReceive(onReceive);
// put the radio into receive mode
LoRa.receive();
}
void loop() {
// do nothing
}
void onReceive(int packetSize) {
// received a packet
Serial.print("Received packet '");
// read packet
for (int i = 0; i < packetSize; i++) {
Serial.print((char)LoRa.read());
}
// print RSSI of packet
Serial.print("' with RSSI ");
Serial.println(LoRa.packetRssi());
}
For example four
#include // Only needed for Arduino 1.6.5 and earlier
#include "SSD1306.h" // alias for `#include "SSD1306Wire.h"`
#include "images.h"
//OLED pins to ESP32 0.96OLEDGPIOs via this connecthin:
//OLED_SDA — GPIO4
//OLED_SCL — GPIO15
//OLED_RST — GPIO16
SSD1306 display(0x3c, 4, 15);
#define DEMO_DURATION 3000
typedef void (*Demo)(void);
int demoMode = 0;
int counter = 1;
void setup() {
pinMode(16,OUTPUT);
digitalWrite(16, LOW); // set GPIO16 low to reset OLED
delay(50);
digitalWrite(16, HIGH); // while OLED is running, must set GPIO16 in high
Serial.begin(115200);
Serial.println();
Serial.println();
// Initialising the UI will init the display too.
display.init();
display.flipScreenVertically();
display.setFont(ArialMT_Plain_10);
}
void drawFontFaceDemo() {
// Font Demo1
// create more fonts at https://oleddisplay.squix.ch/
display.setTextAlignment(TEXT_ALIGN_LEFT);
display.setFont(ArialMT_Plain_10);
display.drawString(0, 0, "Hello world");
display.setFont(ArialMT_Plain_16);
display.drawString(0, 10, "Hello world");
display.setFont(ArialMT_Plain_24);
display.drawString(0, 26, "Hello world");
}
void drawTextFlowDemo() {
display.setFont(ArialMT_Plain_10);
display.setTextAlignment(TEXT_ALIGN_LEFT);
display.drawStringMaxWidth(0, 0, 128,
"Lorem ipsumn dolor sit amet, consetetur sadipscing elitr, sed diam nonumy eirmod tempor invidunt ut labore." );
}
void drawTextAlignmentDemo() {
// Text alignment demo
display.setFont(ArialMT_Plain_10);
// The coordinates define the left starting point of the text
display.setTextAlignment(TEXT_ALIGN_LEFT);
display.drawString(0, 10, "Left aligned (0,10)");
// The coordinates define the center of the text
display.setTextAlignment(TEXT_ALIGN_CENTER);
display.drawString(64, 22, "Center aligned (64,22)");
// The coordinates define the right end of the text
display.setTextAlignment(TEXT_ALIGN_RIGHT);
display.drawString(128, 33, "Right aligned (128,33)");
}
void drawRectDemo() {
// Draw a pixel at given position
for (int i = 0; i < 10; i++) {
display.setPixel(i, i);
display.setPixel(10 – i, i);
}
display.drawRect(12, 12, 20, 20);
// Fill the rectangle
display.fillRect(14, 14, 17, 17);
// Draw a line horizontally
display.drawHorizontalLine(0, 40, 20);
// Draw a line horizontally
display.drawVerticalLine(40, 0, 20);
}
void drawCircleDemo() {
for (int i=1; i < 8; i++) {
display.setColor(WHITE);
display.drawCircle(32, 32, i*3);
if (i % 2 == 0) {
display.setColor(BLACK);
}
display.fillCircle(96, 32, 32 – i* 3);
}
}
void drawProgressBarDemo() {
int progress = (counter / 5) % 100;
// draw the progress bar
display.drawProgressBar(0, 32, 120, 10, progress);
// draw the percentage as String
display.setTextAlignment(TEXT_ALIGN_CENTER);
display.drawString(64, 15, String(progress) + "%");
}
void drawImageDemo() {
// see https://blog.squix.org/2015/05/esp8266-nodemcu-how-to-create-xbm.html
// on how to create xbm files
display.drawXbm(34, 14, WiFi_Logo_width, WiFi_Logo_height, WiFi_Logo_bits);
}
Demo demos[] = {drawFontFaceDemo, drawTextFlowDemo, drawTextAlignmentDemo, drawRectDemo, drawCircleDemo, drawProgressBarDemo, drawImageDemo};
int demoLength = (sizeof(demos) / sizeof(Demo));
long timeSinceLastModeSwitch = 0;
void loop() {
// clear the display
display.clear();
// draw the current demo method
demos[demoMode]();
display.setTextAlignment(TEXT_ALIGN_RIGHT);
display.drawString(10, 128, String(millis()));
// write the buffer to the display
display.display();
if (millis() – timeSinceLastModeSwitch > DEMO_DURATION) {
demoMode = (demoMode + 1) % demoLength;
timeSinceLastModeSwitch = millis();
}
counter++;
delay(10);
}
Note:This product does not include the battery.
Package included: